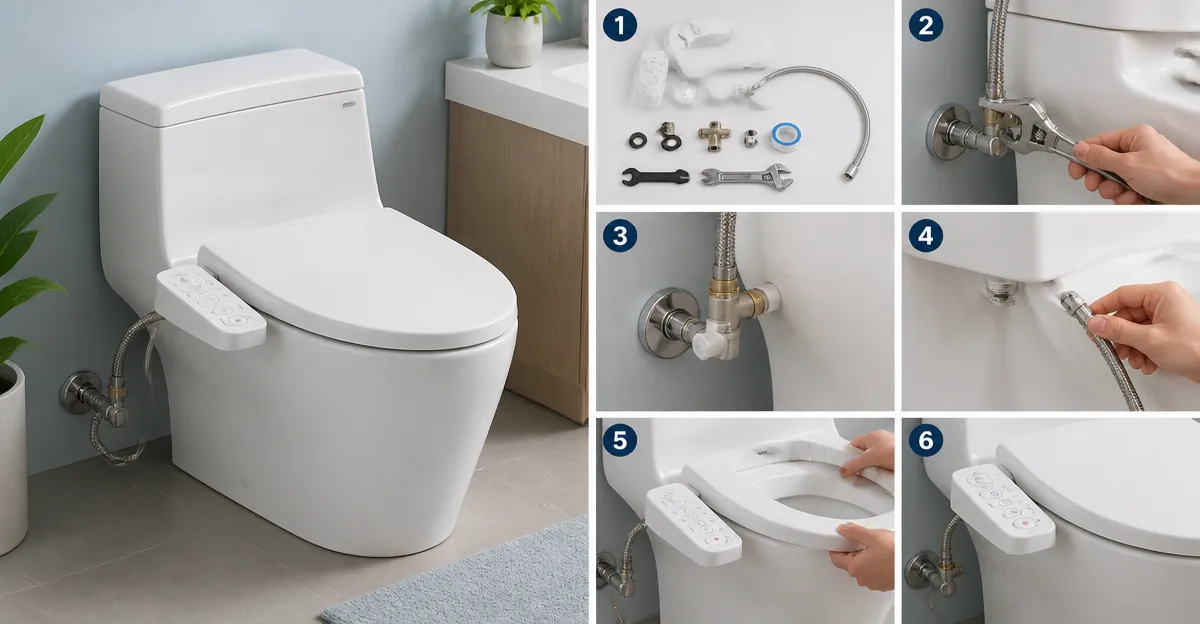
How to Install a Bidet on a One-Piece Toilet: Easy Step-by-Step DIY Guide (No Plumber Needed)
Introduction
This guide will teach the reader how to install a bidet attachment on a one‑piece toilet using only basic tools and a few high‑quality accessories. The process is described in a logical sequence, allowing a homeowner to achieve a hygienic upgrade without calling a plumber. By following the instructions, the reader will save money, reduce toilet‑paper consumption, and improve overall bathroom comfort.
Bidet installations have become increasingly popular because they provide a cleaner, greener alternative to traditional wiping. Modern non‑electric models require only a water‑supply connection, making them suitable for most residential settings. The guide emphasizes safety, proper sealing, and alignment to avoid leaks and ensure long‑term durability.
Although the steps are straightforward, the guide includes product recommendations that simplify each phase. The recommended items have been selected from verified customer feedback, high ratings, and competitive pricing. The reader may choose to use alternative tools, but the suggested products represent the best value for the described task.
By the end of the article, the reader will possess a fully functional bidet, a cleaner bathroom routine, and confidence in performing future plumbing upgrades independently.
What You'll Need
- Bidet attachment (first mention linked below)
- Adjustable wrench or pliers
- Teflon tape (plumber's tape)
- Bucket or towel to catch residual water
- Optional: stainless‑steel T‑adapter with shut‑off valve for extra water‑flow control
Step 1: Verify Compatibility and Gather Materials
Before beginning, the installer should confirm that the one‑piece toilet accepts a standard 7/8" water inlet. Measure the distance between the mounting holes on the toilet to ensure the bidet fitting plates will align properly. Most modern one‑piece models fall within the dimensions listed for the LUXE Bidet NEO 120, which fits toilets with a center‑to‑edge distance up to 7.75 inches and screw spacing between 3.5 and 8.25 inches.
The LUXE Bidet NEO 120 is priced at $39.99 and carries a 4.6‑star rating from over 103,000 reviews. Its high‑pressure metal‑ceramic core valves and steel‑braided hose provide durability superior to plastic‑based alternatives. The self‑cleaning nozzle guard protects the spray tip when not in use, reducing maintenance.
If the homeowner prefers an ultra‑slim profile, the SAMODRA Ultra‑Slim attachment may be considered. Priced at $29.99 with a 4.5‑star rating, it is 0.19 inches thick and includes dual nozzles for posterior and feminine cleaning.
Gather all components from the chosen package, including the mounting brackets, flexible hose, and any included T‑adapter. Having all parts at hand prevents interruptions during installation.
Step 2: Shut Off the Water Supply
Locate the shut‑off valve on the wall or behind the toilet. Turn the valve clockwise until it stops to cease water flow. Open the toilet flush lever to drain any remaining water from the tank and bowl. Place a bucket or towel beneath the supply line to catch residual water when disconnecting the hose.
If the installer wishes to have an additional shut‑off point directly on the bidet, the optional Luxe metal T‑adapter with shut‑off valve (often sold separately for $15) offers rapid isolation of the bidet without affecting the toilet. This feature is praised in user reviews for preventing accidental flooding.
Confirm that the water supply is fully closed by attempting to turn the faucet on; no water should emerge. This precaution protects the installer from unexpected spray and reduces the risk of water damage.
Once the supply is secured, proceed to detach the existing supply hose from the toilet inlet.
Step 3: Remove the Existing Supply Hose
Using an adjustable wrench, loosen the coupling nut connecting the flexible hose to the toilet’s fill valve. Turn the nut counter‑clockwise until it separates. If the hose is threaded, a gentle twist may release it without tools.
Inspect the threads for wear or mineral buildup. Clean any debris with a cloth to ensure a tight seal when the new hose is installed. Apply Teflon tape to the male threads of the toilet inlet; wrap the tape clockwise for three full rotations, then smooth it with a fingertip.
For installers choosing the SAMODRA Ultra‑Slim model, note that the hose includes a screened end and an unscreened end. The screened end must connect to the water supply, as indicated in the packaging. This detail prevents confusion during assembly.
After taping, the installer is ready to attach the bidet’s flexible hose.
Step 4: Mount the Bidet Attachment
Position the bidet attachment beneath the toilet seat, aligning the mounting holes with the existing bolts on the toilet bowl. Most one‑piece toilets provide two pre‑drilled holes spaced between 3.5 and 8.25 inches. The LUXE Bidet NEO 120 includes adjustable fitting plates that slide to accommodate this range.
Secure the attachment using the supplied bolts and washers. Tighten each bolt evenly to avoid skewing the unit. The bidet should sit flush against the bowl without protruding excessively. Users have reported that adding small rubber bumpers under the seat can level the unit if the toilet seat is slightly uneven.
If the chosen model is the PIKETS Dual Nozzle Bidet, the mounting hardware is similarly universal. The product is priced at $29.99, carries a 4.5‑star rating, and includes a T‑connector with integrated Teflon tape for a leak‑free seal.
After the brackets are firmly in place, double‑check that the nozzle guard is oriented upward, allowing the nozzle to retract safely after each use.
Step 5: Connect the Flexible Hose
Attach the bidet’s stainless‑steel braided hose to the toilet’s supply line. For the LUXE model, the hose terminates with a standard 1/2" male thread. Screw it onto the taped inlet until hand‑tight, then give a final quarter‑turn with the wrench. Avoid overtightening, which could damage the brass fitting.
The SAMODRA Dual Nozzle Bidet (price $21.99, rating 4.5) also uses a stainless steel hose and includes a quick‑release button for easy removal during cleaning. This feature is advantageous for homeowners who prefer periodic deep cleaning of the toilet bowl.
Once the hose is connected, ensure that there are no kinks or sharp bends that could restrict water flow. A smooth curve promotes consistent pressure and reduces the likelihood of nozzle clogging.
Finally, re‑attach the toilet’s water supply valve if it was removed, and verify that the T‑adapter (if used) is fully open.
Step 6: Install the Toilet Seat (If Required)
Many bidet attachments are designed to work with the existing seat, but some users prefer to replace a low‑quality plastic seat with a sturdier model. The LUXE bidet fits most standard two‑piece and one‑piece seats without additional modifications. If the current seat is damaged, install a new seat following the manufacturer’s instructions, then re‑mount the bidet.
When installing a new seat, align the seat bolts with the holes created for the bidet brackets. Use a screwdriver to tighten the bolts, ensuring that the seat sits level. This step prevents wobbling during use.
For the Brondell Swash Ecoseat (price $89.99, rating 4.2), the entire seat replaces the existing one, providing an integrated bidet with dual nozzles and ambient water temperature control. Installation is similar but requires removal of the old seat and attachment of the new seat’s mounting hardware.
After the seat is secured, verify that the bidet controls are reachable from the user’s dominant side. The LUXE model places the control lever on the left side, which may be advantageous for users with limited shoulder mobility.
Step 7: Test for Leaks and Adjust Pressure
Turn the main water supply valve counter‑clockwise to restore flow. Observe the connection points for any drips. If a leak is detected, tighten the coupling nut a half‑turn and re‑apply Teflon tape if necessary.
Once the system is leak‑free, sit on the toilet and activate the bidet using the control lever or button. Begin with the lowest pressure setting and gradually increase until a comfortable spray is achieved. The LUXE NEO 120 features a pressure knob that provides fine‑grained adjustment, allowing the user to customize the experience.
For models with dual nozzles, such as the SAMODRA Ultra‑Slim, rotate the mode selector to switch between posterior and feminine cleaning. Adjust the pressure using the rotary controller, which reaches maximum pressure at a 90‑degree turn.
Perform a brief self‑cleaning cycle by activating the dedicated button (present on PIKETS and SAMODRA Dual Nozzle models). This action flushes water through the nozzle to remove residue, ensuring hygienic operation.
Tips & Pro Tips
- Apply a thin layer of silicone sealant around the hose connection if the installer anticipates frequent pressure adjustments.
- Wrap the toilet bowl opening with plastic wrap during the initial test to prevent accidental overspray, as suggested by Brondell users.
- For households with children, consider installing the control lever on the side opposite the dominant hand to reduce accidental activation.
- Regularly activate the self‑cleaning function to maintain nozzle hygiene and prevent mineral buildup.
- If water temperature feels too cold in winter, install a small inline water heater; however, the non‑electric models function adequately with cool water for most users.
Troubleshooting
No Water Flow: Verify that the shut‑off valve is fully open and that the hose is not kinked. Check that the pressure knob is turned beyond the initial “off” position.
Leaking at the Connection: Ensure Teflon tape is applied correctly and that the coupling nut is tightened securely. Replace a damaged washer if necessary.
Weak Spray: Adjust the pressure knob upward. If the spray remains weak, inspect the nozzle for blockage and run a self‑cleaning cycle.
Excessive Overspray: Re‑position the seat slightly forward or adjust the nozzle angle using the control lever. Some models allow fine‑tuning of nozzle direction.
Conclusion
The reader now possesses a complete, step‑by‑step methodology for installing a bidet on a one‑piece toilet without professional assistance. By selecting a high‑quality attachment, securing proper connections, and testing for leaks, the homeowner can enjoy a cleaner, more sustainable bathroom experience.
Following the tips and troubleshooting advice will minimize common issues and extend the lifespan of the bidet. The guide encourages confidence in future DIY plumbing projects, reinforcing the value of self‑reliance and cost savings.
Products Mentioned in This Guide
Frequently Asked Questions
What basic tools are required to install a bidet on a one‑piece toilet?
You only need an adjustable wrench, a screwdriver, Teflon tape, and a bucket for water catch.
Can I install a non‑electric bidet attachment without hiring a plumber?
Yes, the installation is DIY‑friendly and can be completed in under an hour with the right instructions.
How can I ensure a leak‑free connection when attaching the bidet?
Wrap Teflon tape on the faucet threads, tighten the fittings securely, and test for drips before finalizing.
Will adding a bidet affect my toilet’s warranty or performance?
A properly installed bidet typically does not void the toilet warranty and maintains normal flushing performance.
What are the main benefits of installing a bidet on a one‑piece toilet?
Bidets reduce toilet‑paper use, improve hygiene, and provide a more comfortable bathroom experience.